Okay, time to stir the pot, another Covid Project!

I knew it, classic. Still getting my parts together on your kick ass table. But now had a high temp alarm, fire in hopper and just trying to get the grill replaced. Traeger Rep. called the place I bought it from and they hung up on him. Man have had this grill since July and 4 cooks on it. CRAZY !!
Ya, sounds like a lemon, hope they sort it out!
 
If anyone needs links to the parts I used let me know.
You should sell these as a kit. Im sure therr are alot off guys out there, including me, with the same problem.
if you could, i would lime the links to the parts.
Thanks in advance.
 
Hell, I'm retired, I could make some kits, how many of you are interested?

I could wire it up, pre program the timer (with instructions on how to adjust timing with your phone via WiFi), you would need to drill the holes in your hopper etc. The parts, Motor, Timer, switches, Power module, carbon fiber drive shaft, coupler, bearings & cup, spring steel whiskers total just about $100

What would be a reasonable price for a kit?
 
I’m interested in a kit. I’ve done several of your other mods (COVID projects) and am pleased with the results with my 850. A pellet stirrer would be great for overnight brisket cooks. Your $100 seems reasonable
 
I've decided not to make kits, but here's links to the parts, feel free to ask questions here should you decide to build one for your grill and I'll do what I can to help.

Motor 16RPM 12V, I used stainless steel screws etc from my local ACE store, I believe the motor needs 3mm screws to mount.
Amazon.com: BRINGSMART 12V 16rpm DC Worm Gear Motor 70kg.cm High Torque Turbine Electric Gearbox Motor Self-locking Reversed Mini Engine Geared Motor for DIY Robot Door Lock Curtain Machine (12V 16rpm): Home Improvement

12V Power Supply Module;
Amazon.com: [UL Listed] Chanzon 12V 2A 24W AC DC Switching Power Supply Adapter (Input 100-240V, Output 12 Volt 2 Amp) Wall Wart Transformer Charger for DC12V CCTV Camera LED Strip Light (6Ft Cord, 24 Watt Max): Home Audio & Theater

Power Switch, I liked this illuminated switch, same style at the Trager switch;
Amazon.com: APIELE 16mm Latching Push Button Switch 12V DC On Off Black Shell with LED Angel Eye Head for 0.63" Mounting Hole with Wire Socket Plug Self-Locking (Blue/Black Shell): Automotive

Interval Timer with built-in WiFi for programming from your phone;
Timer WIFI 10 AMP 6V 12V 18V 24V TIME ON OFF DELAY CONFIGURABLE, CYCLING and OPTIONAL TRIGGER - - Amazon.com

8mm Carbon Fiber Rod, this is the drive shaft, the end that will insert into the bearing cup at the end opposite the motor will need light sanding to insert into the 8mm ID bearings, I just chucked the shaft into my drill and used 220 grit sandpaper to thin down the last 3/4" of the rod just enough for the rod to slide into the bearings. You will drill five 1mm holes in the shaft for the 1mm piano wire pellet tickler whiskers to insert;
Amazon.com: uxcell 8mm Carbon Fiber Rod for RC Airplane Matte Pole US, 400mm 15.7 inch, 1pc: Industrial & Scientific

8mm Flex Coupling, this is used to connect the drive shaft to the motor, avoiding any alignment issues;
Xnrtop 8mm to 8mm Shaft Coupling 25mm Length 18mm Diameter Stepper Motor Coupler Aluminum Alloy Joint Connector for 3D Printer CNC Machine DIY Encoder(Pack of 2): Amazon.com: Industrial & Scientific

8mm ID Bearings, these will insert into a standard 3/4" copper water line solder cap as a holder.
ANCIRS, 20 Pack 608-2RS Ball Bearing - Double Rubber Sealed Shielded Miniature Deep Groove 608rs Bearings for Skateboards, Inline Skates, Scooters, Roller Blade Skates & Long boards (8mm x 22mm x 7mm) - - Amazon.com

3/4" Copper Cap, this holds the shaft bearings and is attached to the side of the pellet hopper, opposite the motor with a single screw. I used a stainless screw with head outside, and self-locking nut inside of the cup.
You can probably get one at ACE for less.
Supply Giant DUFD0034-5 Copper Sweat Plug End Cap Pipe Fitting, 3/4 - - Amazon.com

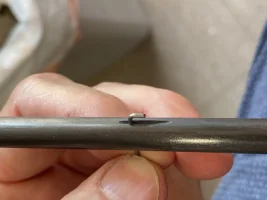
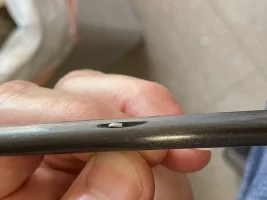
1mm Music Wire, AKA 0.039" Piano Wire, common in hobby shops for model aircraft. Used for the pellet stirring whiskers. I drilled 1mm holes in the drive shaft and put a small groove in the shaft with a Dremmel tool cut off disk. I mounted the motor and drive shaft into the hopper, then measured the distance from the shaft to the bottom of the hopper and then cut the whiskers about 1.5" longer. I bent one end of the wire about 1/8" at 90 degrees, then insert into the shaft and press into the groove. I have the motor run clockwise when looking from the front of the grill, this sweeps the pellets towards the auger. I wrap the wire whiskers about 1/2 turn around the shaft, in a spiral, and bend the tips to avoid getting poked in a finger when using the grill. This spiral allows the whiskers to wind up and flex when the hopper is full, and unwind and reach the pellets when the level is lower, but they should not touch the bottom to prevent paint wear. Keep the hopper lid closed during operation as it shoots pellets like a popcorn maker! See attached pictures of the whiskers;
Amazon.com: K & S PRECISION METALS 497 0.039" x 36" Music Wire (4 Pack): Home Improvement

That's the majority of the parts, I used various diameters of heat shrink tubing to seal the shaft bearings etc somewhat from pellet dust. I used a small button switch to activate the WiFi module to allow programming as needed, you press and hold the button when powering up the Stir motor for 3-4sec, then connect your phone to the WiFi Modules "network", and make changes using the phone's web browser. I stir the pot for 10 seconds (a couple of revolutions of the shaft), once every hour for long cooks which seems to be a good interval.

As always, feel free to ask for more details on any aspect you need help with.
 

Attachments

  • IMG_8403.JPG
    IMG_8403.JPG
    104.3 KB · Views: 73
  • IMG_8404.JPG
    IMG_8404.JPG
    102.7 KB · Views: 72
  • IMG_8567.jpg
    IMG_8567.jpg
    288.6 KB · Views: 73
Last edited:
I've decided not to make kits, but here's links to the parts, feel free to ask questions here should you decide to build one for your grill and I'll do what I can to help.
Hey Reme, How is this project going now that you have some more run time on it?
 
Hey Reme, How is this project going now that you have some more run time on it?
It's a keeper, I just smoked a brisket for 23 hours and never touched the hopper, no pellet tunnel. Combined with the insulation, only used about 1/2 a hopper!
 
It's a keeper, I just smoked a brisket for 23 hours and never touched the hopper, no pellet tunnel. Combined with the insulation, only used about 1/2 a hopper!
Thats excellent 1/2 hopper for 23hr cook is the TL850 under cover and sheilded from the wind.
 
It's working really well! I just replaced the "ticklers" with longer ones and trimmed them after being mounted in the hopper, so they just miss the sides. I wound them a bit on the carbon fiber drive shaft to give them more spring so they never bind, even with a full hopper. And just for grins, I got a spare motor in a lower gear range. Now the shaft spins at 3.5rpm instead of 12rpm, figured stronger still and more gentle on the pellets.

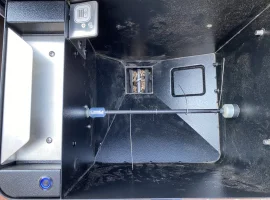
Here's a picture of the hopper after 12 hours of running, pellets are pretty level, and this was before I extended the ticklers to their max lengths which will only make it better at all pellet levels. I also reversed the tickler order, so they will not only level the pellets but will lightly push the pellets towards the front of the hopper. Notice that the pellets are a bit higher in the back of the hopper, this is before this last tweak. I had the timer set to stir two revolutions every hour.

Also attached video of the current "final" version with improved tickler whiskers.

I didn't do a time lapse as it was misty and wet out when I cooked my brisket so I kept everything closed up. I don't have any overhead covers in my yard, may need to get a cheap pop up for this winter now that I'm cooking more.
View attachment 2455
View attachment 2456
Absolutely frigging ingenious!!! Thanks for posting everything :)
 
Thanks so much for this. I just added a pellet unit into the vertical cabinet smoker that I fabbed a few years ago. First test smoke yesterday and had one pellet vortex over the 15 hrs. Was considering going down the path that you have documented here, and stumbled across this with Google. Awesome work…I’ll be doing something very similar soon!
 

Latest Discussions

Back
Top